Registration Steps
We know registration can be a complicated and stressful process. Taking the steps below should help prepare you for a successful registration process, the key is to be flexible and look at all options!
Step #1: Clear all registration holds
- You may be prevented from registering if you have a hold on your account. You can view your holds by logging on to your Cal Poly portal, click on “Student Center,” and any holds, warnings, or to-do-list items will appear on the right side of the screen.
- If you see a hold, click on “details” to see what action is needed to have the hold removed or to complete the to-do-list item.
- Keep an eye on this section during registration rotations because holds may appear at any time.
The university has developed many helpful tools to help you track of your progress and plan for registration. Here are some of the key tools you should use to prepare for registration:
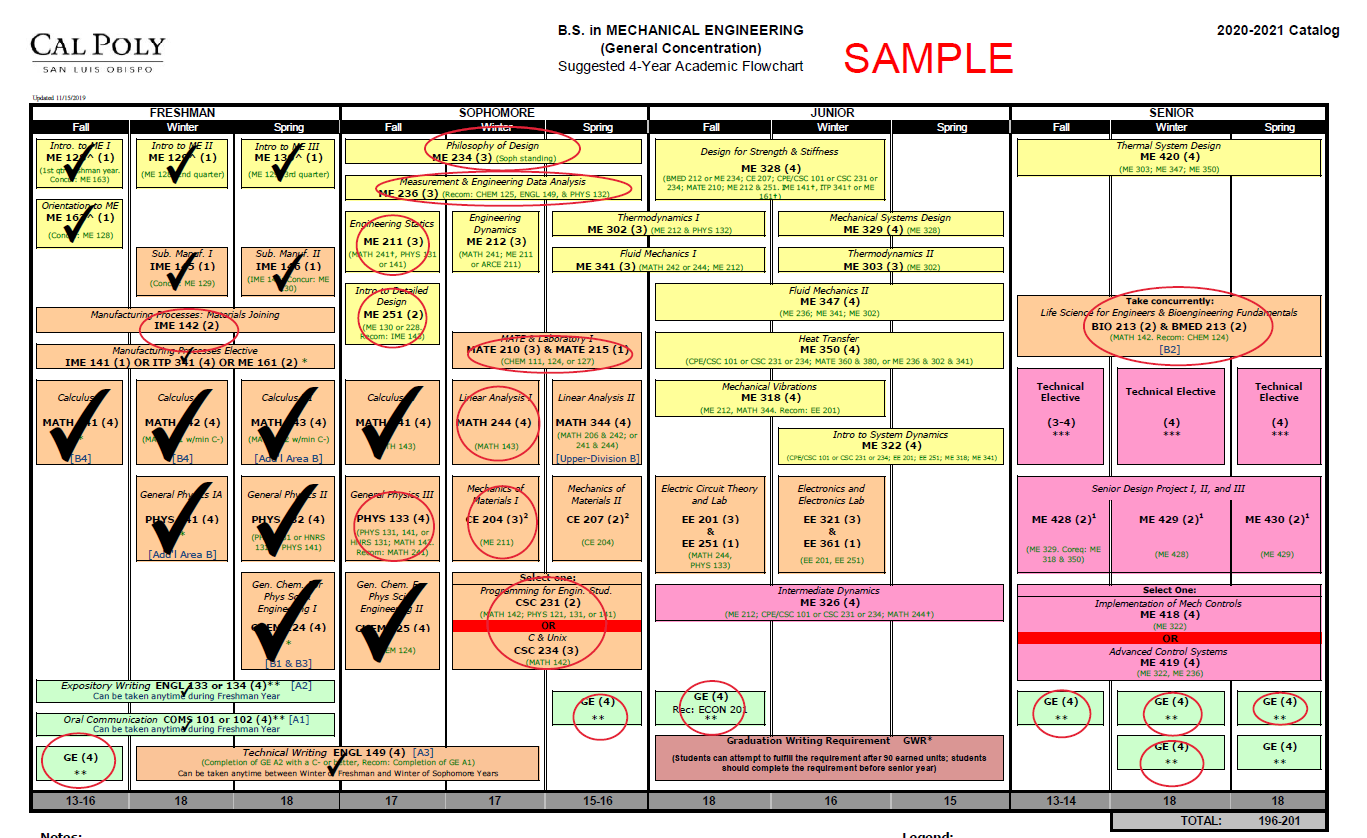
- Flowchart: Sample 4-year plan. Great tool for planning and seeing the sequence of courses. Note: Flowcharts are unofficial and a static document; students must always follow the most current prerequisites for all courses.
- Degree Progress Report: Official means of checking what credit you have completed, pending, and outstanding.
- Curriculum Sheet: Summary of all degree requirements in 1-2 pages. A good way to see degree requirements in a clear way and see elective options.
- Term Typically Offered: Registrar website that shows when departments tentatively plan to offer courses. Subject to change.
- Schedule Builder and Class Search: You can use either of these tools to look for open courses. Tip: we recommend searching for GE's using the Class Search tool as it allows you to look at all available courses per GE area.
- Degree Planner: A degree planning tool that you can update to plan for graduation and provides course demand data to departments. We advise using this tool in conjunction with the steps below to determine what courses to register for.
Step #3: Update your flowchart
Your flowchart is a great tool to track your progress and plan ahead. It is important to make sure you are looking at the flowchart for your catalog. If you are unsure what catalog you are following you can find it on your PolyProfile (linked under the “Academics” tab in your portal).
- All flowcharts can be downloaded through the Flowcharts Page
- Using your DPR, cross off the courses you already have credit for or are currently enrolled in (assuming you will pass) and circle all of the courses you meet the prerequisites for, even if they are in future quarters on your flowchart.
- You can identify the prerequisites required by looking at the courses on the flowchart and reading the small text in parentheses. Prerequisites (prereqs) may also change occasionally, so you should check updated prereqs in the current catalog.
- Sometimes the system might not recognize a pre-req (i.e. if you substituted another Cal Poly course for the pre-req). In these cases, you may need a permission number to enroll.
- While updating your flowchart, you will identify ALL courses you are eligible to take.
Step #4: Identify and prioritize courses for registration
Now that you have identified ALL courses you are eligible to take next quarter, here are some things to keep in mind:
- Prioritize courses that are prereqs for future courses. Pay attention to the sequencing of courses and what is coming up.
- Check the quarter courses are offered via Term Typically Offered. As you plan, it is important to know if courses may only be offered once or twice a year. Note: these are subject to change and so we also recommend checking with your department if you have questions about course offerings.
- Look ahead. It is important to understand the entirety of the curriculum and how it plays together. Pay attention to coursework in the future that may have a number of prereqs and/or is only offered occasionally and plan accordingly.
- Based on your list of courses, start to develop a first-choice schedule and back-up courses in case you don’t get your first-choice.
Step #5: Create and save schedules in Schedule Builder (with back up options)
- Build and save multiple schedules
- What does a “back-up” schedule look like?
- We recommend that you have back up courses to register in (those you identified you meet the prereqs for in Step #3).
- In addition, we recommend you have back-up time slots. If your preferred section of a course is full but there are other sections with open seats, be flexible and enroll in one of the open sections!
- Check prerequisites. Schedule Builder will show you the prereq for each course. Double check that you meet the prerequisites before your registration day/time. Prereqs can change in newer catalogs and you must meet the most current prereq.
- Utilize the waitlist appropriately. The waitlist can be a great option to try to get into courses that are already full. However, we do not recommend relying solely on the waitlist to enroll. Many times, students can enroll in a full course-load without waitlisting if they look for other sections of the course or other courses.Advisors can also help!
Step #6: Enroll in courses
Courses fill up quickly, make sure you register as close to your assigned day/time as possible.
Students can enroll in courses using the options below:
- Student Center: allows you to search for classes, add/enroll in classes, swap classes (exchange one class for another), edit classes (change a lab or grading style), drop classes, and view your waitlist position.
- Schedule Builder: allows you to search for classes, see all sections and open seat capacity, arrange a variety of classes into possible schedules, and add/enroll in classes.
- Permission Numbers: Permission numbers are needed to enroll after the 4th day of instruction and/or if you override a requisite. See previous link for more details.
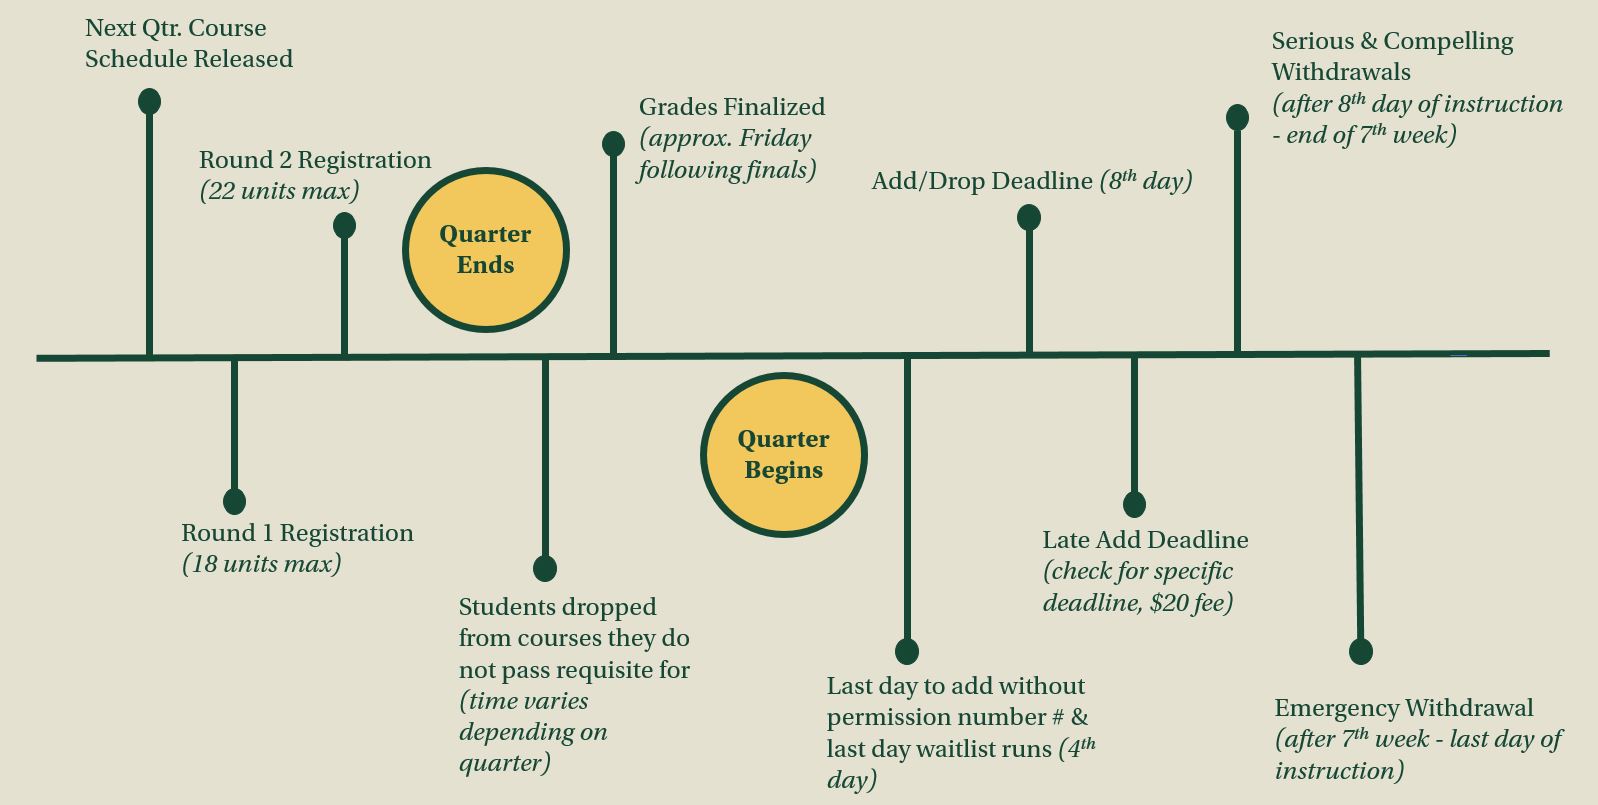
Registration Timeline
There are many deadlines and processes that affect registration. Below is a summary of events that can affect your enrollment. Always check the Student Planning Calendar for exact dates and deadlines.
Registration Resources
